Color Grading with DaVinci Resolve
Here I present my color grading effort through the use of DaVinci Resolve 12.5 from Blackmagic Design. I have PowerDirector 14 and PhotoDirector 7. PowerDirector is my main video editing software and I have experience using the color adjustment features in PhotoDirector for photos. I also experimented with color grading in ColorDirector 4. DaVinci Resolve 12.5 is a powerful color grading tool for videos. Here are my color grading style samples.

The video footage was shot using my Panasonic Lumix DMC-G7 camera with my Panasonic Lumix G X Vario 35-100mm lens. Video recording was done with the DMC-G7's Standard profile during festivities on Canada Day 150 at the Toronto Waterfront. The video clip was over-exposed, likely due to lack of attention while being distracted by the festive atmosphere. Using DaVinci Resolve, the exposure was corrected and color grading was performed along with editing adjustments for enhancement. Video editing was done in CyberLink PowerDirector.
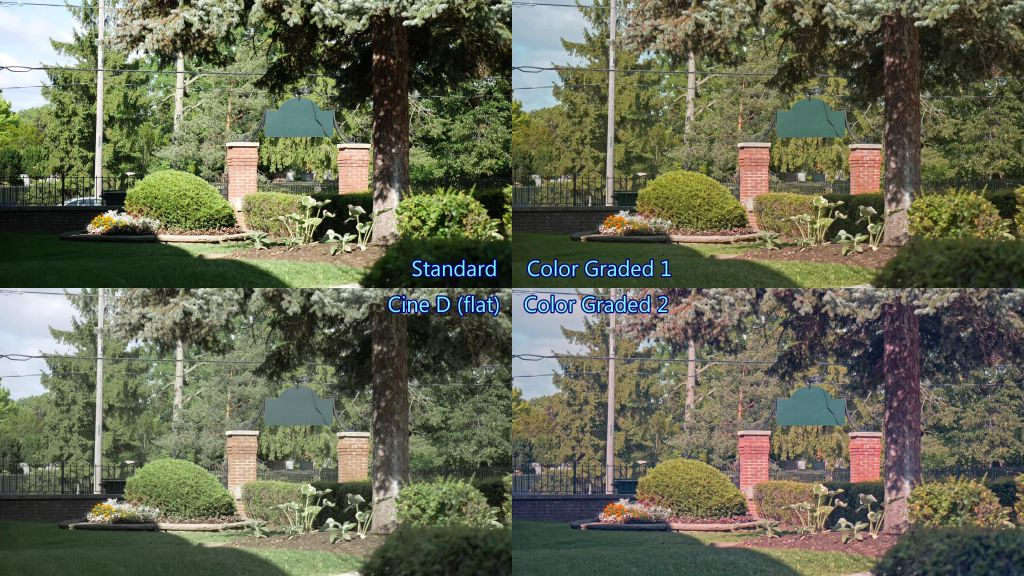
The video footage was shot using my Panasonic Lumix DMC-G7 camera with my Panasonic Lumix G X Vario 35-100mm lens. Video recording was done with the DMC-G7's Standard and Cinelike D (flat) profiles. "flat" means the lowest -5 value for all 4 parameters Contrast, Sharpness, Noise Reduction and Saturation. Two color grading styles were applied to the Cine D footage.
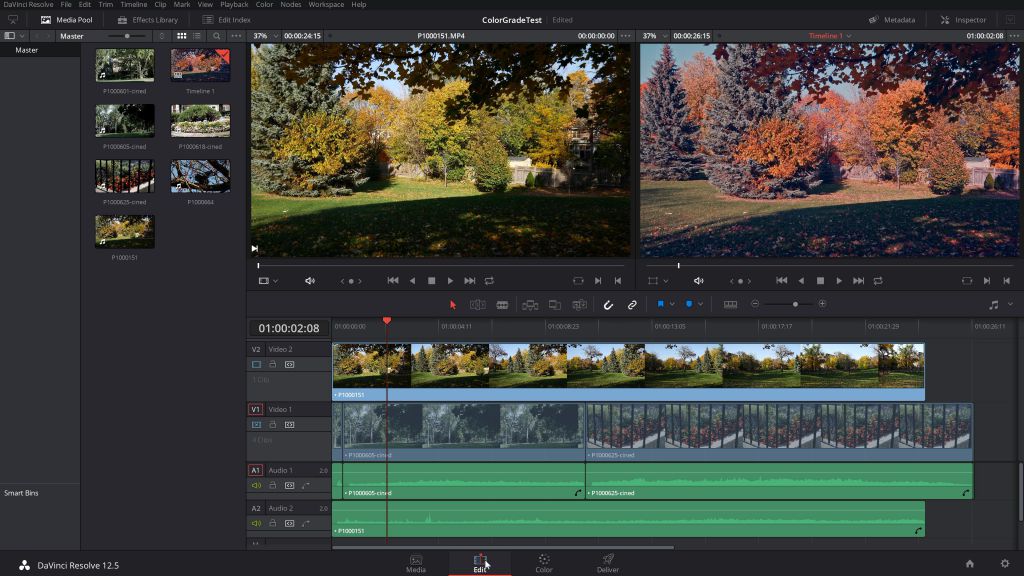
I color graded park video footage shot with my Panasonic Lumix DMC-G7 camera. In addition to showing the color grading results, I also show the use of DaVinci Resolve and CyberLink PowerDirector in the production of the following color grading video.
In addition to color grading, DaVinci Resolve 12.5 comes with sophisticated video editing capabilities which I use to composite video segments while my main video editing and production tend to be done in CyberLink PowerDirector. Furthermore, I use DaVinci Resolve for color adjustments on photos as well as green screen processing in videos and photos.
In this Indoor Video Shoot, I used DaVinci Resolve to digitally create my "pink room" with green screen processing to place the models into my room.
In this Indoor Photo Shoot, I used DaVinci Resolve for green screen processing to place the models into my room.
In this Harvest Moon video, I used DaVinci Resolve to replace the faceless moon with its face which required dynamic tracking of the moon traveling slowly across the night sky.
In this Pippa Middleton photo shoot, I used DaVinci Resolve's sophisticated features (power windows, chroma keying and masking) to place Pippa into my apartment. This takes more editing effort but the results are even more impressive than green screen processing.
This following video shows the enhancement of a photo by adjusting exposure, contrast, sharpness and saturation - and by applying a subtle but significant color grade to improve the overall look of the photo from a Toronto Music Garden performance. I used DaVinci Resolve to make the adjustments.
This following video shows photos enhanced and color graded in various styles using DaVinci Resolve.
2010 Aug Sep Oct Nov Dec
2011 Jan Feb Mar Apr Jun Sep Oct Dec
2012 Jan Feb Apr May Jun Oct Nov Dec
2013 Jan Feb Mar May Jun Dec
2014 Jan Mar Jun Jul Aug Oct Nov Dec
2015 Jan Feb Mar Apr May Jun Oct Nov Dec
2016 Jan Feb Mar Apr May Jun Jul Aug Sep Oct Nov Dec
2017 Jan Feb Apr Oct
2018 Jan Feb Mar Apr
2020 Mar Apr May


